Webhosting Blog

Latest

Booting SUSE in single user mode


For basic system administration function you might require to reboot your SUSE server in maintenance / single user mode.

Follow following set of steps to boot the server in single user mode.

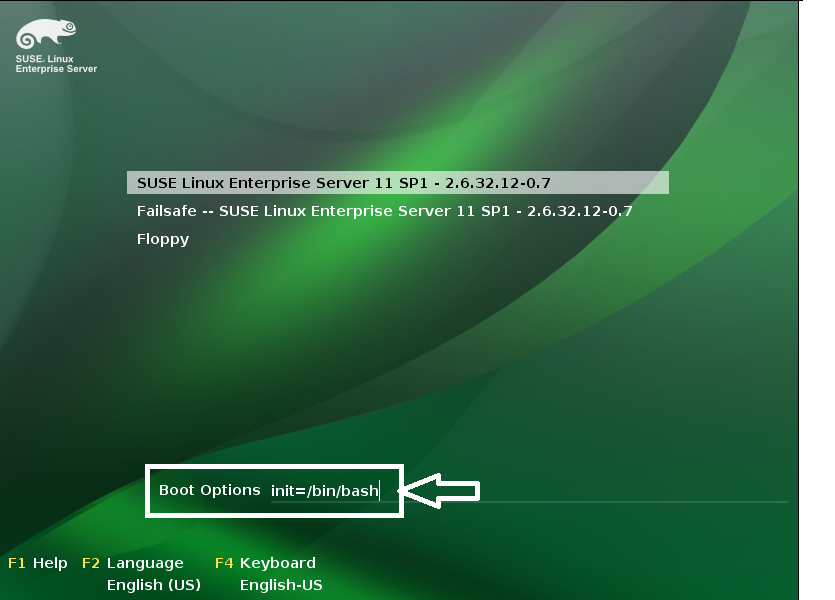
1. At the boot screen select the normal kernel for booting the server.

2. At the bottom of the screen you might observe the boot Options menu.

3. On the boot options menu place the following command to boot in single user mode.

boot option init=/bin/bash

susesinglemode

4. This should now boot the server in single user mode.

5. for basic server administration check if the servers root partition is mounted in a rw mode with a mount command.

6. If not mount the partition in rw mode with the command

<none>~ # mount -o remount,rw /

7. once done reboot the server .


ERROR: Insufficient free extents in volume group


While adding a logical volume you might face an error as follows:

Insufficient free extents (XXXX) in volume group VOLUMEGROUPNAME: XXXXX required

localhost:~ # lvcreate -L +100G -n <logical_vol_name> <vg_name>

  Insufficient free extents (25599) in volume group vg_data: 25600 required

This error basically arrises as the vgdisplay or the vgs command try to round off and manipulate the assigned size in to human readable format.

To work around this issue you can consider using the physical extent units instead of the exact byte format for the size limits.

Following the steps mentioned below can help to sort the issue:

Use the following command to verify the free extent and total extent count:

localhost:~ # vgs -o +vg_free_count,vg_extent_count

  VG          #PV #LV #SN Attr   VSize   VFree   Free  #Ext

  vg_data   1   0   0 wz–n- 100.00G 100.00G 25599 25599

You can notice the free extents available are 25599 . Now in order to use the free extent value instead of the byte size you can use the option -l as follows

localhost:~ # lvcreate -l 25599 -n LV_home vg_data

  Logical volume “LV_home” created

Above command will use all the available free extents. Check this with the following command.

   localhost:~ # vgs -o +vg_free_count,vg_extent_count

               VG      #PV #LV #SN Attr   VSize   VFree Free #Ext

               vg_data   1   1   0 wz–n- 100.00G    0     0 25599

Now view the created logical volume.

localhost:~ # lvdisplay

  — Logical volume —

  LV Name                /dev/vg_data/LV_home

  VG Name                vg_data

  LV UUID                3BLbnm-8KfX-pHOm-oE5f-GRei-qTN8-uHFgZI

  LV Write Access        read/write

  LV Status              available

  # open                 0

  LV Size                100.00 GB

  Current LE             25599

  Segments               1

  Allocation             inherit

  Read ahead sectors     0

  Block device           253:0
 

Configuring NTP synchronization in SUSE Linux Using YAST


To configure a SUSE server with NTP you can follow following steps:

We will use the Yast tool to configure the NTP on the SUSE server.

Issue the Command as follows to initiate the yast tool.

#yast

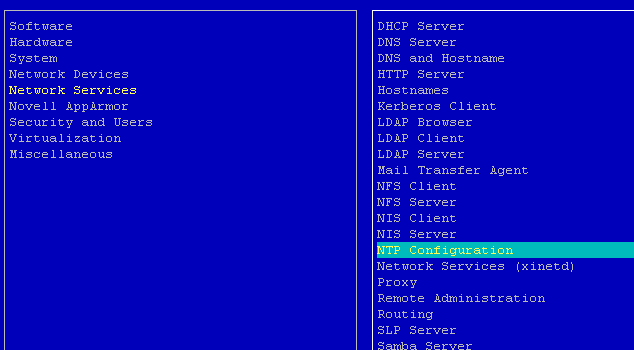
You can find basic yast configuration screen as follows. Navigate to Network Services and select NTP configuration.

YastConfig

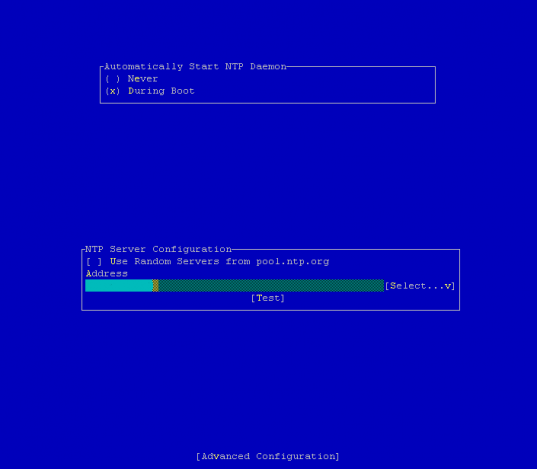
This will open the basic NTP configuration screen.

BasicSettings

To configure the server with the basic NTP time synchronization while bootup of the servers select the option During Boot . In the NTP Server configuration section you can use the Random timeservers  Servers  or you can configure the required NTP server to be configured with the server in the Address section.

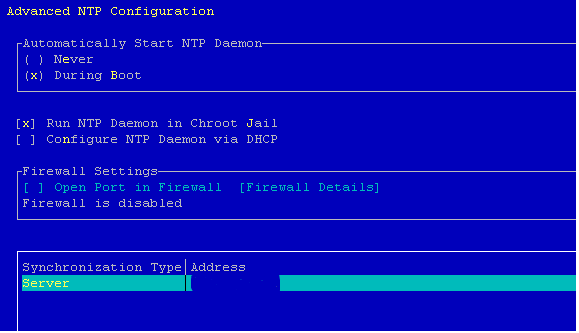
You can configure Advanced Settings for the NTP server via the Advanced Configuration setting.

It will open a screen similar to the following:

ADVSettings

Select the Edit option and place the appropriate Server details in the Address section. Once Done Click on Finish. It will auto restart all the respective services for NTP. Quit the Yast tool once all the above settings are done as mentioned.

You can check the configuration using the ntpq command.

#ntpq -p

Or

# ntpq

ntpq> peers

This will print a list of the peers known to the server. Thats it! The server is now synchronized with the mentioned NTP server.

How To Use Proxy Server To Access Internet via Shell Prompt ?


If you are accessing the text based internet in linux especially when you are accessing the application or the web configured behind proxy server(squid specifically), you might not be able to get the complete functionality / application working.

For enabling the access you will have to enable the environment variable called http_proxy on your server / machine. This variable enables the access to the application or the text based sessions via the proxy server. You will just need to know the hostname (or IP address) of the proxy server and the proxy port number of the proxy server.

You can enable the variable by using the  following command to set proxy server.

[root@server]# export http_proxy=http://server-ip:port/

If you are using an IP address for enabling the variable you can use the following command:

[root@server]# export http_proxy=http://10.0.0.1:3128/

If you are using hostname for the proxy server you can use the following command:
[root@server]# export http_proxy=http://proxy_server_domainname:3128/

You are now all set to go!

2012 in review


The WordPress.com stats helper monkeys prepared a 2012 annual report for this blog.

Here’s an excerpt:

4,329 films were submitted to the 2012 Cannes Film Festival. This blog had 44,000 views in 2012. If each view were a film, this blog would power 10 Film Festivals

Click here to see the complete report.